It offers extensive AI based editing functionality. It has powerful editing filters, layers (so you can do things like replace skies, and make composit images, apply texture overlays etc). It has denoise filters, upscaling and a host of other features. As these change regularly, I suggest you do a web search for recent reviews (don’t use older reviews, they can be misleading, but here is one that is current as I write this (jan 2023) https://expertphotography.com/luminar-neo-review/).
The user interface is straight forward and logical, and includes tabs for file management (catalog) and editing. It supports editing presets that can be useful to quickly apply a suite of editing steps to a photo (or a batch of photos).
Among the touted feature list (some of these are in the extensions pack at extra cost):
AI Enhance
Supercontrast
Power line removal AI
Sky replacement AI
Mask AI
Layers
Portrait Bokeh AI
Portrait background removal AI
Face AI (lots of tools for smoothing skin, reshaping faces/eyes/noses etc, removing bags under eyes etc etc.)
Relight AI
Noise Reduction
Focus Stacking
Upscale
Supersharp (Sharpening tool)
Skylum allow you to download a 30-day trial, so you can see if it suits your needs before purchase.
The ultimate aim of post processing is to produce photographic art, be it a relatively straight forward edit of light and shadow, or more complex manipulations including compositing. This section will cover some Artistic aspects of photography from inspiration to the final product.
Your images are composed of pixels, each representing a spot of colour. Typically your camera will produce images more than 2000 pixels (px) high and more than 3000 px wide. The more pixels, the larger the storage needed for the files and the more bandwidth needed to send them electronically. If you want to use one of your images on the web, or perhaps submit to WCC for one of our monthly competitions or an outing gallery, you will need to produce a reduced size copy to a smaller specified size.
Tip: Always make a reduced size image as a copy. Don’t overwrite your original file.
Photoshop
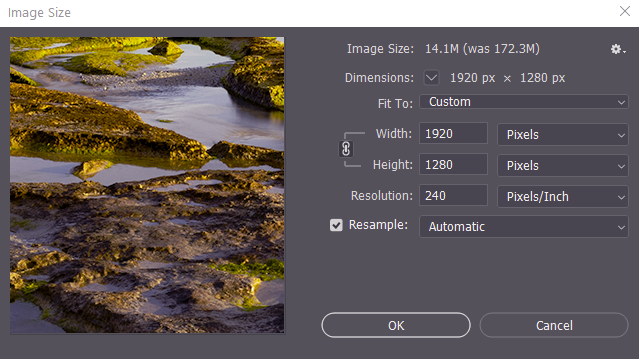
In Photoshop, resizing images is easy. First save a copy of the full size image (eg MyBeautifulLandscape-2048px.jpg) using the File > Save as menu. Now you are ready to resize. Open the Image > Image Size menu to show the Image Size dialog.
You will note that there are boxes for Width and Height. Check that the units to the right are set to Pixels. Check that the chain symbol linking width and height is set. This ensures the width and height will change in concert so there is no vertical or horizontal stretching in the result. Check the Resample check box is set. For WCC competitions images need to be at most 1920 px wide and at most 1080 px high. So, in the dialog enter 1920 Pixels in the width box. As you enter numbers, the height is automatically adjusted to match the image aspect ratio. Is the height 1080 or less? if you are ready to move on. However, with my image this reset the height to 1280 pixels, which is greater than 1080, so we need to make the height less. Change the height setting to 1080 Pixels and click in the width box. Width is 1620, less than 1920, so this is acceptable. Try not to use sizes where both the width and the height are less than the maximum allowed. If you do, your image will look small when shown at competition night, and the judge may find it hard to assess a smaller image.
If the image is for electronic display the resolution setting (here 240 Pixels/inch) is not important – it might make a difference if you are pasting into a wordprocessing document or presentation software. Best idea is to set it at one of the standards, 240 or 300 pixels/inch.
Next to the resample checkbox is a control to set the method for resampling. Usually you would use the Automatic setting.
Once you have configured the dialog simply press OK. The image will appear to shrink on screen (Image Size does not change the zoom setting. Press Ctrl-0 to expand the image to fill the window, or Ctrl-1 to zoom it to 1:1.
Save the image (as JPEG for WCC competitions), and you are done.
Lightroom
In Lightroom you use the Export module to export images (see below). Set the required size in Image Sizing, configure whatever else is needed, and click OK.
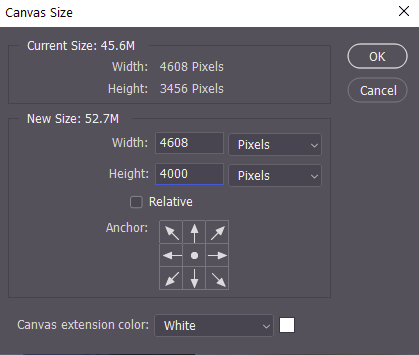
Resize the Canvas
You might want to resize the canvas without changing the pixels on the image. For example you might want to add extra sky above an existing image. In Photoshop you use the Image >>Canvas Size menu. This shows the current size in pixels. To add, say, more space at the top, the Relative checkbos determines if the pixels you add are added to the existing pixels, of if the pixels you set are the final canvas size. Set the Anchor at the bottom (so the extra space is at the top), and enter a new canvas size, with the current width and some extra pixels height (see right). Choose the extension colour – what colour the newly added pixels will be, and click OK.
You can use tools like Content Aware Fill, or careful clone stamp use, to fill in the new area in your image.
You might want to restrict an edit to a particular area of your image. You might want to move an object within your image. You might want to, for example, select a bird (or three) from one image, and place them on a different image.
Selection Hints
Zoom to 100% or greater for precise selections
Selection tools have options like feathering.
If you need to make precise selections, I suggest zooming in to greater than 1:1 (100%) so you can most clearly see the edges you might want to select. You may need to do a bit of scrolling to get around the whole image, but your selections will be more accurate and so it is worth the extra time. Selection tools come with options like feathering, and in general you can make a partial selection, change tools or tool options, and resume, adding to the selection, or perhaps subtracting from the selection. You might want to save a selection as you go for complex (time consuming) selections.
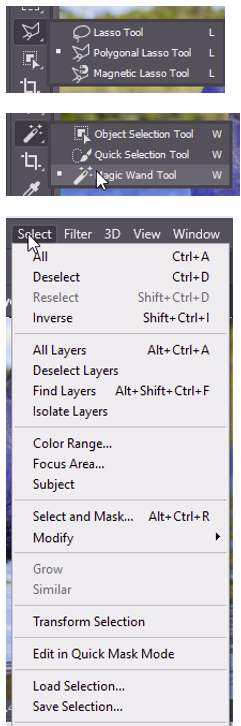
Selecting in Photoshop
Photoshop has multiple selection tools and multiple options for the tools. Rather than me spending hours reinventing wheels, check out Adobe’s Selection tools HERE. Note that there are some very sophisticated automatic selection tools – notably select subject and select focus area on the Select menu that usually give you a good starting point (they often need a bit of refining, but they can sale a lot of time). The Select and Mask tool is also very powerful. Read more about these quick selection tools via the Adobe training website HERE.
Note that once you have made a selection you can:
save the selection
invert the selection
add to the selection with the same or different tool
subtract from the selection with the same or different tool
modify the selection – grow/expand/shrink / contract, feather, smooth. border.
Lightroom: with the local adjustment tools you can paint/erase the masks, use the AutoMask function and/or use the Range Mask controls to restrict the mask based on luminance or colour.
Layers are a workhorse of post processing and are worth a little effort. They will save you much stress and wasted time as part of a non-destructive workflow. I give a basic introduction to layers and masks below. I go into more detail on these pages: layers, masks, and there are links at the bottom of this and my other pages to further tutorials.
What are Layers?
Think of layers like a set of acetate sheets on top of your base (background) image. These layers can adjust the image (exposure, contrast, curves etc), or overlay new image components Below is an example. The background layer contains the milky way. On top of that I have some adjustment layers to adjust the tonal range and to reduce image noise. On top of that I have added a spaceman (actually a photo of a sculpture outside the space museum in Leicester). Further layers contain the spanners, nuts and bolts that I have strewn across the starfield. Each layer adds a new component to build up the final composition.
Composite image with adjustment layers, and layers containing image parts to overlay.
I could have done all these edits on the one background layer, selecting and pasting the spaceman directly onto the starfield layer, but if later in my processing I decided I wanted to move the spaceman (or a spanner) I would have to start again from scratch since I would have replaced part of the starfield background with the newly added objects. Since the different image parts are in layers I just need to move the image in the relevant layer. The starfield layer is intact so when I move an overlying layer, the starfield under the spaceman reappears as I move them. Likewise I can adjust exposure, curves etc on each layer individually to ensure all parts match up in lighting and tonality.
You might notice that for some layers, to the right of the layer thumbnail is another thumbnail filled with black and white shapes. These represent layer masks. A mask, as the name suggests, hides things. About 3 layers down in the example, you see a layer labelled Black Spaceman, with a layer mask. The mask is masking (hiding) some bushes and buildings and the pedestal that were parts of the original image of the statue that I don’t want to appear in my composite image. Not only can masks blank out part of an image layer, they can be used to mask adjustments. For example with a landscape photo, you might want to darken the sky. You could apply an adjustment to darken the sky, but this will also darken the ground. However if you apply a mask to the layer you can limit the darkening just to the sky. And if you are clever you might use a gradient from black to white in your mask. Black masks (turns off) the adjustment, white gives the full adjustment, and levels of grey give partial effect of the adjustment depending on the greyness.
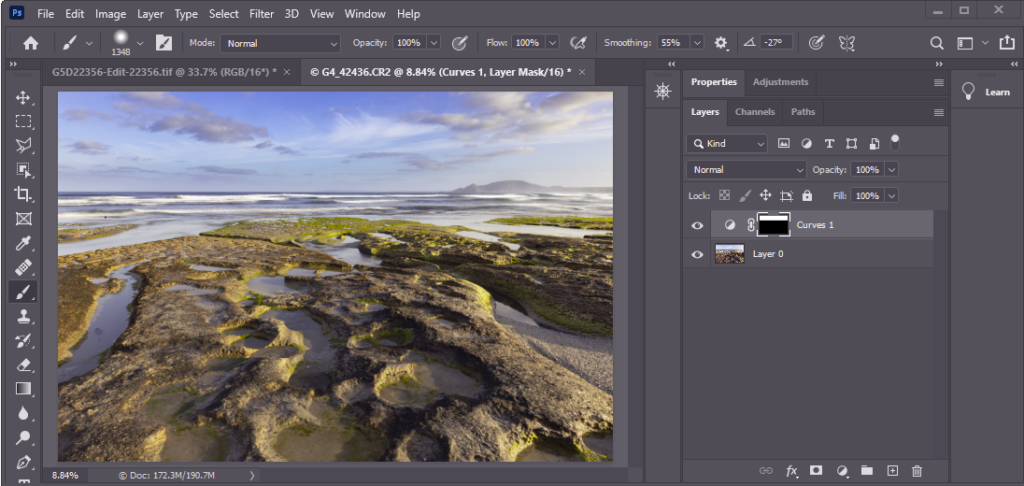
Consider the landscape below. To me the sky looks a little washed out.
So let’s apply a curves layer to tweak the sky. Now the sky looks better, but the foreground is now too dark.
So, click on the adjustment layer mask and draw a black to white gradient going up a little from the horizon. I also painted black on the mask in the area over the hills above the horizon so they weren’t darkened. Compare this image with the image appearance we started with. Hopefully you will agree that it is improved. Still not happy – just tweak the curves further, or add a new adjustment layer to add to the adjustments. Want to compare before and after? click on the eyeball to the left of the layer to turn the layer off and see the image without that layer. Click the eyeball again to turn the layer on again.
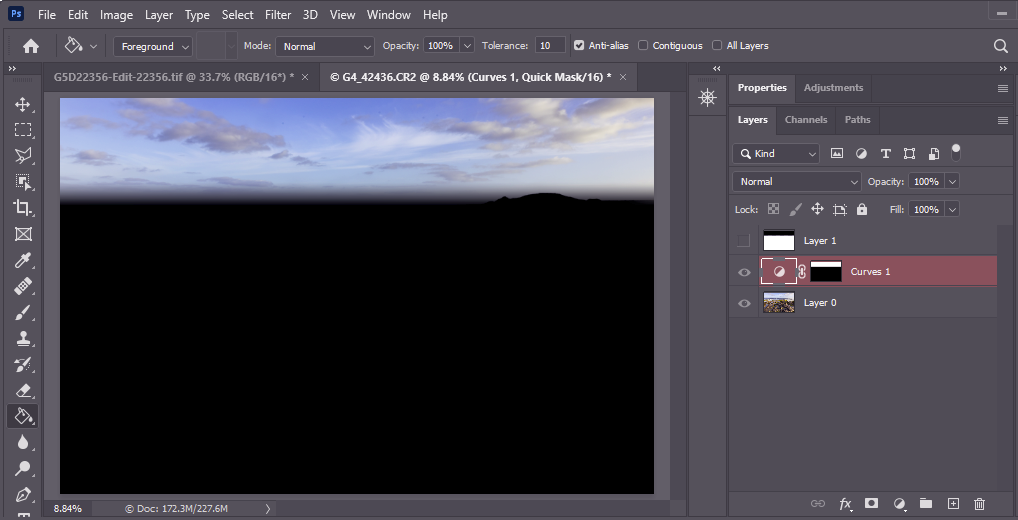
You can see the mask on the curves adjustment layer thumbnail, but this doesn’t show the mask very clearly. Here is what the mask looks at full frame like in quick mask mode (Q) with the quick mask options set for opaque black to really highlight the boundaries of the mask. Normally the quick mask gives a red mask with 50% transparency so you can see the image underneath, but in this example I wanted to show the mask more clearly.
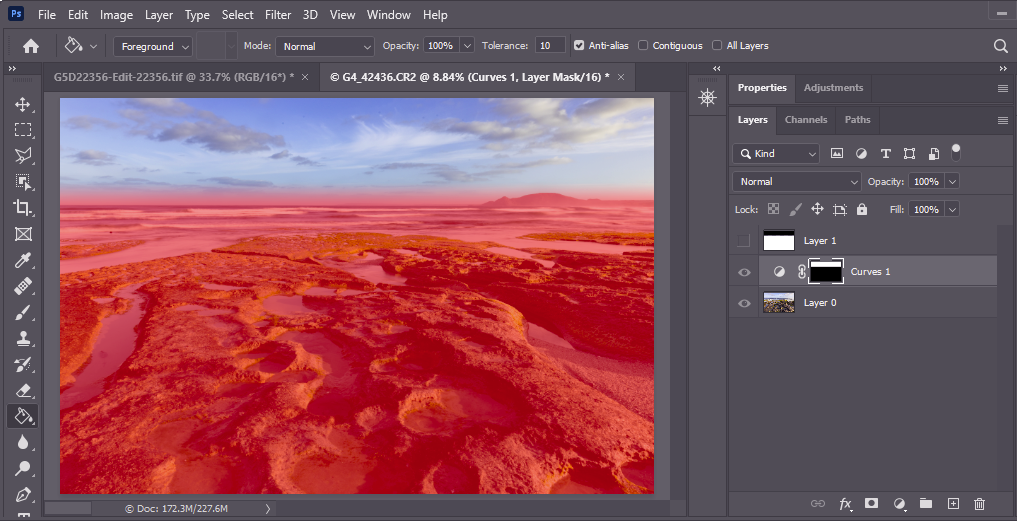
Below the same image with the normal quick mask settings. You can see all the image through the quick mask, but the details at the edges (eg the masking of the hills on the horizon) are not so clear,
Hopefully I have convinced you that layers and masks are an essential part of your processing workflow. Check out the Resources section below for more detail on how to use them.
Note: in PS layers called Background have special properties. PS limits some edits on them to preserve your original image. You can duplicate the image (Ctrl-J) or menu Layer > Duplicate layer, to make a normal layer with the image copied in, or double click on the background layer name and rename it so it is no longer limited as the background layer (an image does not need a background layer).
If you want to come back to your image later and change the exposure, you can adjust the settings on that exposure layer. You aren’t changing the original image so you can come back as often as you like and tweak things with no accumulating image degradation. Want to go back to the original image? turn off or delete the adjustment layers. These sorts of edits are called non-destructive edits.
If you aren’t using PS, you may still be using layers and masks. When editing your images in Lightroom, layers are used, but LR simplifies life for you by hiding the layers. When you apply a global change, say in exposure, LR creates an invisible (to you) layer with the exposure adjustment over the top of the original image layer. The local edit tools (linear gradient, radial gradient, brush tool) you are effectively creating adjustment layers with masks. If you want to see the mask, click the check box Show selected mask overlay underneath the image, and a translucent red mask will show you where the effect is active.
Luminar, Affinity Photo, Topaz Photo Studio all (I think) allow you to add adjustments on layers. they also allow you to add image layers for a texture overlay, replace backgrounds or to add new elements to the image. They work in similar ways to what I have described above, but consult the application documentation to discover the nitty-gritty for those applications. Lightroom and DxO Photo lab don’t have layers, as such, but allows detailed local adjustments to be applied – effectively adjustment layers with masks; however the equivalent of image layers are not available in these applications (at present) .
With Levels and Curves you can fine tune the tonal range and even colours in your images.
Levels
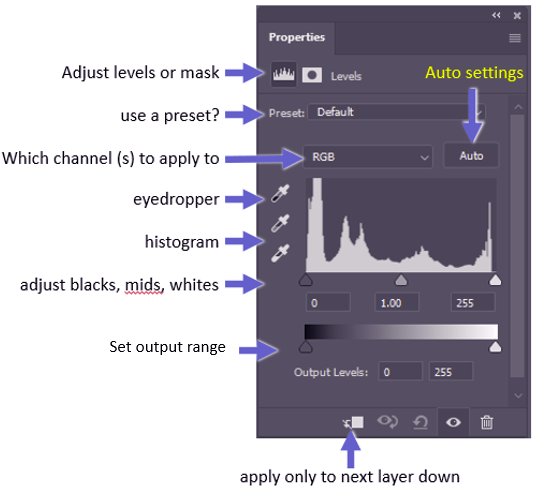
In Photoshop the Layers dialog has many features. The main ones are labelled below.
Try out the AUTO settings – it will try to balance the photo to a reasonably distributed histogram. Sometimes it works well, at least as a way to get started. If you don’t like the result, you can undo it (Ctrl-Z or Edit>>Undo or click back in the History panel). Click the black, mid or white eyedropper and then click on your image in a black/mid/white area. The channels will be balanced to produce pure black/mid grey/pure white for the tones selected. This can be a great way to clear a colour cast (eg a bluish tone in shadows).
Play with the adjustment sliders to see what they do. You can set the output range to limit the maximum white or black.
If you want, choose one of the individual colour channels rather than the overall RGB. Adjusting levels in a single channel will alter the colour balance and can be a good approach to dealing with colour casts (also look at split toning).
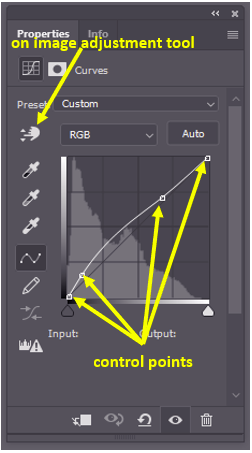
Curves adjustments are similar to Layers, but this allows more nuanced adjustments. On the histogram is a black 45 degree line which represents no change. If you click on the line to add a control point and drag the line upwards or downwards, you will lighten or darken the relevant tones. By adding multiple control points you can selectively alter some tones but not others. Click on the on image adjustment tool, and you can drag on an image area that you want to adjust (drag up to lighten, down to darken). You can remove control points by dragging them off the dialog.
Choose an individual colour channel rather than RGB to selectively adjust a single chanel at a time. This can be very useful to remove (or add) a colour cast, say to shadows.
Levels and Curves adjustment layers can be masked to limit the areas on the image that are affected by the adjustment.
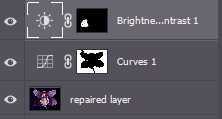
In the image left you can see some of the layers as I edit an orchid photo. I have a curves layer that is masked so it adjusts just the background and a brightness layer that is masked to adjust just one of the petals that was too dark. See the section on Layers and Masks for more info.
By default levels or curves adjustment layers works on the combined output of all the layers below it. But at the bottom is a control to limit the effect of the adjustment just to the layer immediately below.
Below are links related to applications other than photoshop, but apart from slight differences in the menu systems and dialogs, the same principles apply and these links are also applicable to photoshop, as the ones above are applicable to other programs.
Whilst the exposure controls control the mid-tones, the Highlights and Shadows controls work on these ends of the tone range. In addition the Whites and Blacks controls adjust the upper and lower limits of the brightness range – this is particularly relevant where you are using Raw files, where the file contains the full tonal range the sensor can capture, which is generally much greater than the screen or printer can display. Using these controls you can bring out detail in what initially looks like black shadow areas, and recover detail in overblown highlights.
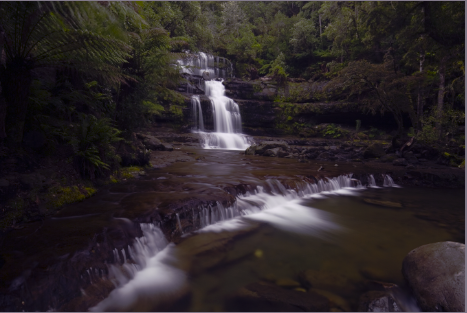
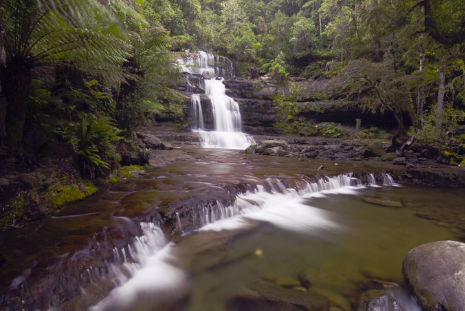
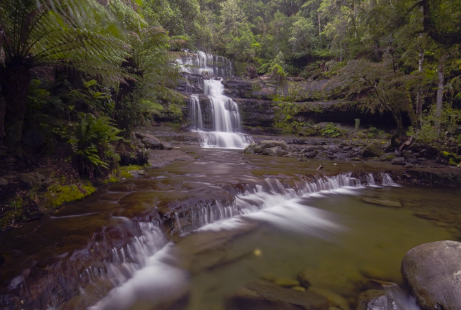
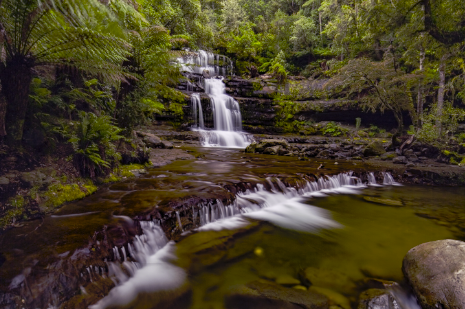
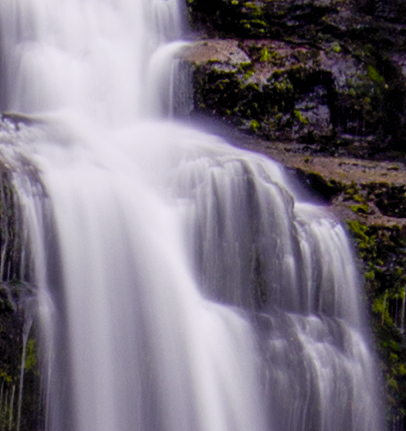
Consider the following image. Here we have a scene with huge dynamic range. To try to get detail in the whites of the water fall, the image looks underexposed
Boosting the exposure slider 1.5 stops gives better exposure of the forest, but the water is now overexposed and lacks detail
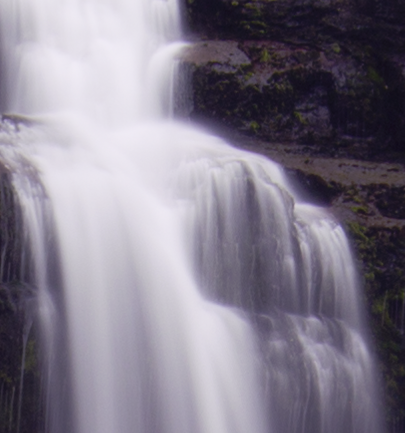
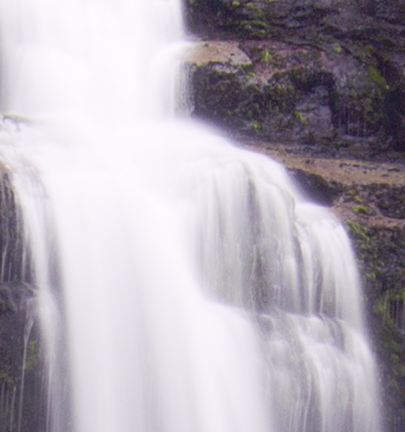
Dragging the highlights slider down restores detail in the water.
Boosting shadows gives more detail in the shadows under the cliff, and adding some clarity and dehaze filter and some vibrance gives the resulting image more punch.
These controls can also be useful more creatively, if you want to make an image more dramatically contrasty, by decreasing the shadows to make a darker, more moody effect, or boosting the highlights for a high-key look.
In some software you may find a dehaze control which also adjusts tonality, in particular reducing blue luminosity (haze tends to be bluish) and increasing contrast. These controls can be fantastic for cutting through haze, but might also be of value in other situations too. Twiddle the control and see what the effects are on your images.
Often, as in Photoshop, there are advanced options on these controls that fine tune how the effects apply. The best way to learn about these controls is to experiment with your own software on a variety of your own images. Have fun.
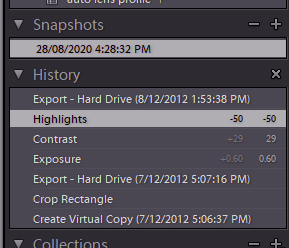
Lightroom has a non-destructive workflow, using a history of your actions to reconstruct the final edited image. You can save snapshots of your edits at any time,or make virtual copies with different editing paths starting from the same original image. By clicking back in the history you can return to any previous stage in your edits even if you close and reopen Lightroom.
Photo editing often involves many processing steps and a lot of trial and error. If, at the end of an hour of processing you decide you really should have done something different right at the beginning, you would like to be able to modify the original edit, rather than discarding everything and starting again. Welcome to the world of non-destructive editing.
By non-destructive we mean that the original image is not changed; the end result is achieved by applying transformations and changes on top of that image, with each of the things you do on top able to be adjusted. Mostly, that is achievable. For example in the cat image below (in Photoshop), I can select the eyes and apply a colour balance filter to change the eye colour. But this overwrites the original pixels of the eye. I can never get the original eye colour back. With non-destructive edits I would select the eyes, copy the eyes to a new layer, and apply the colour change to the new layer with the eyes. If I want to undo I can turn off visibility of the colour balance layer or the colour balance filter layer, and the original (unchanged) cat image is again visible. I recommend you use non-destructive editing wherever possible.
Lightroom makes this easy. All edits in LR are non-destructive so you can undo edits by backing off down the history; and by using virtual copies or editing snapshots you can generate multiple versions of the same original image using different editing pathways, to try out different possibilities then choose the one you like best. Because LR remembers the editing history, there is no duplication of the original image so a great saving in disk space and reduction in file management. Many of the other alternative software packages also support non-destructive editing (some to different degrees – you may need to explicitly save the processing steps (or recipe) along with the output image if you want to return and modify the original edits for a new version.
In Photoshop or similar programs,
work in layers;
use adjustment layers rather than adjusting the underlying pixels;
use layer masks to make your adjustments local to part of the image;
always keep a version of your work as a layered file format like PSD or TIFF so you have the option to adjust your edits later.
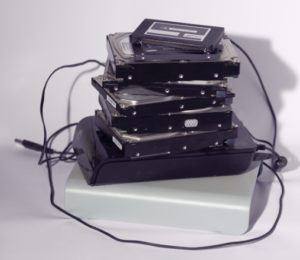
Tidying my room a while agoI came across a very dusty doc I had made yonks ago on the importance of computer backup. It had the “Backup song” that parodies the song “Yesterday” by the Beatles. I rather like it, and it still rings true today. Enjoy.
Yesterday, All those backups seemed a waste of pay. Now my database has gone away. Oh I believe in yesterday. Suddenly, There’s not half the files there used to be, And there’s a deadline hanging over me. The system crashed so suddenly. I pushed something wrong What it was I could not say. Now my data’s gone and I long for yesterday-ay-ay-ay. Yesterday, The need for back-ups seemed so far away. Thought all my data was here to stay, Now I believe in yesterday.
A stack of failed disk drives. Lucky I had backups
Now, getting serious! Your disk drive with all your photos WILL fail. Perhaps not today, perhaps not this year, but at some stage it will fail. You just don’t know when. Current expectation is that about 2.5% of disk drives will fail over a period of one year (even if they are brand new).
Check your disks
Your operating system may have some tools to check your drives’ current health (eg Win10 disk health check) though how reliable these are at predicting disk failure is contentious. Your best bet is to assume your drive(s) may fail at any time, and have good disaster recovery plans (ie backups)
Checking disks On Windows: open a command prompt (in the start menu type CMD and press enter.) in the command console window, type “wmic diskdrive get model,status” and press enter. This should generate a list like this:
Microsoft Windows [Version 10.0.19042.1237]
(c) Microsoft Corporation. All rights reserved.

C:\Windows\System32>wmic diskdrive get model,status
Model                                    Status
ÿÿÿÿÿÿÿÿ ÿÿÿÿ USB Device                 OK
ATA ST6000VN0033-2EE SCSI Disk Device    OK
Seagate Backup+  Desk SCSI Disk Device   OK
ATA ST10000DM0004 SCSI Disk Device       OK
Samsung SSD 840 EVO 250GB                OK
Seagate Expansion Desk SCSI Disk Device  OK
ATA Samsung SSD 850 SCSI Disk Device     OK


C:\Windows\System32>
On Mac: you can monitor the status of your external hard drive by opening Disk Utility by going to Applications and then Utilities. Next, you will click on the drive you would like to test to see how it’s performing. Once you click the drive you would like to check on in the top right corner, click on First Aid. If your drive is performing well, you’ll be able to scroll until you find where it says the volume appears to be OK. If it is not performing well, this process will automatically notify you of any problems like file corruption, an external device not working properly, or that your computer won’t start up. Disk Utility will not detect or repair all problems that a disk may have, but it can give you a general picture.
Backup Photos and Catalog files
I will focus on backing up your photos and catalog files (don’t forget the catalog files made by Lightroom and many other software packages. They contain all the information on the edits you made. You don’t want to lose those edits!). Thus we will consider file based backups not whole disk copies for this purpose.
Make more than one backup – a common recommendation is to keep at least 3 backups, two locally, on different sorts of media (eg internal hard drive, and external hard drive), and at least one copy off-site (perhaps an external hard drive you keep at your workplace, or leave with a relative or friend; perhaps a cloud based solution).
Keep at least one backup off site. Yes, I know I just said that, but it is important and often ignored. If you have a fire, or a burglar takes your computer and disks, you may have lost all your backups.
Update your backups regularly. Set calendar reminders to update those off-site backup disks – you will need to retrieve them, update them, and return them to their safe off-site location.
Periodically check that the backups are still readable/error free.
Since we are talking about backing up photos, we are probably talking Terrabytes (TB) not megabytes, so large capacity is essential. Below I outline some options.
Disk Drives
A USB-SATA disk caddy allows you to use internal drives externally.
These days disk drives are cheap. An internal 8 TB drive can be bought for just over $300; an external 8 TB drive looks to be about the same price – a pittance compared to what you have paid for your camera gear. I have an internal drive that I duplicate my image files onto, and an external USB3 drive likewise. I have some old internal drives from my previous PC that I backup onto (using a USB-SATA disk caddy that lets me use internal SATA drives via USB – I have seen these as cheap as $12), then take these to my work office (off site backup).
Network Accessible Storage (NAS)
NAS systems provide external disk space accessible via network (or USB). These may use multiple disk drives configured to internally replicate the contents to provide fault tolerance, so if one drive on the array of drives fails, the data is still secure on the remaining drives. Since they can combine the storage of multiple disk drives they can provide a logical disk volume that is much larger than a single disk, if you have HUGE storage needs. However, a NAS is effectively another computer, and comes with maintenance overheads and a learning curve if you want to make the most of the investment. Unless you need to access the storage across a network, or access the same storage from multiple computers regularly, a simple external drive is cheaper and probably a more suitable option.
Cloud Storage
Cloud storage (ie storage on a remote disk array, accessible via the internet) may be worth considering. Storage is usually charged monthly or annually based on amount and features. If you have very high storage needs, look for one that offers “unlimited storage” (but check the fine print – a lot of “unlimited” offers come with caveats). There are many companies offering these services. Offerings change over time so it’s best if you search the web to find a suitable cloud storage system that suits your needs and budget if you want to go that way. Some offer free trials so you can check them out. Check reviews on the web to see what other people are saying (tip: tell your search engine to find pages from, say, the last year, so you get up-to-date information.) Here is an article that discusses cloud storage in more detail https://photographylife.com/cloud-storage-for-photographers.
Software
It’s best for you to check the web for reviews of what is available, as software is changing all the time. Check for recent reviews and overviews in reputable unbiased sources (rather than ads by the software makers).
Windows
I use (on Win10 [update, it is still working on Win11]) an old package called Yadis Backup which works in the background. I have it synch my main image folder (which also contains my LR catalog) to an external drive. Whenever a file is added to the main folder, it gets duplicated immediately on the external drive without me having to think about it. Alas, Yadis is no longer actively maintained. However, there are several similar packages around. Try https://alternativeto.net/software/yadis-backup/ for some (not comprehensive) suggestions. FreeFileSync is worth considering. It can be set up to provide real-time backup and is a very robust and actively maintained open-source program for Windows, OSX and Linux.
There are many third party apps in the Mac App Store. In addition you can use an rsync based strategy (see below – under the hood OSX has a linux like core).
Linux
There are many options in Linux. One of the standards here is rsync, which has a host of options and can maintain synchronisation between files and folders over slow connections (eg over internet) using extremely efficient algorithms.
More resources on Backup
There are lots of other resources on the web. You may find they have a lot in common, but scan them. You may well find extra nuggets that might better suit your personal neess.
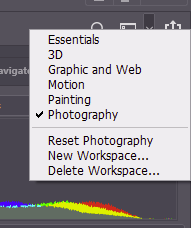
A workspace refers to the collection of user interface elements on your screen and their layout. Photoshop has a vast number of features, so the workspace usually gives a subset of the available tools and functions. You can customise this workspace to suit what you need, and you can save specific configurations of your workspace that you may suit your needs for particular tasks so that you can easily return to that workspace next time you want to repeat that task. Photoshop comes with a default set of workspaces that you can use as-is or customise to suit your needs, or modify and save as a new configuration. Remember too that there generally are many ways to achieve each result, including keyboard shortcuts, so even if a tool you need is not immediately visible, you may be able to call it up with a keypress.
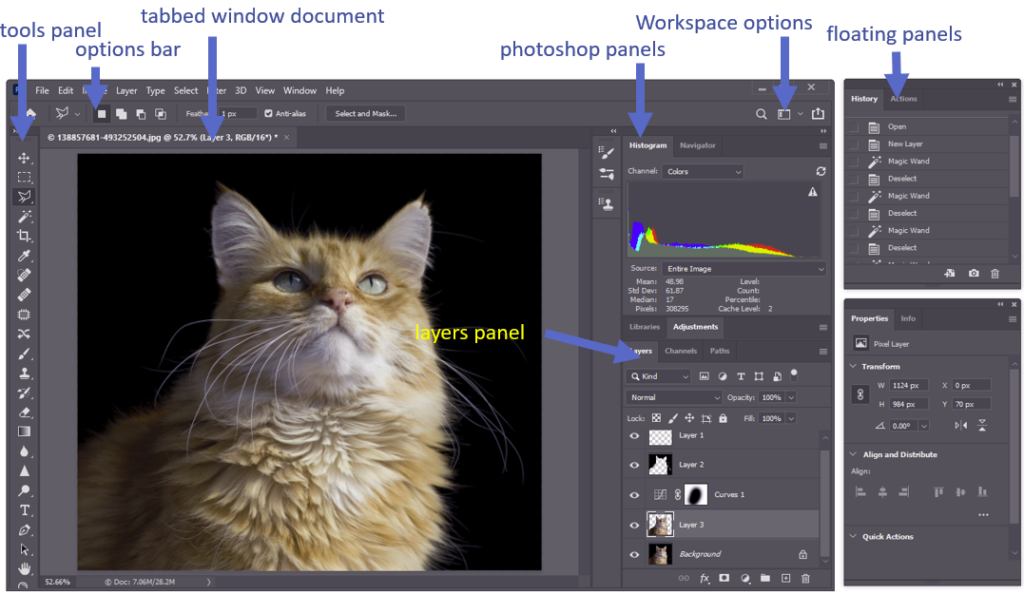
The photoshop workspace may look a little daunting at first, with a lot of icons and panels, but with use it becomes easy.
Photoshop’s workspace
Open an image in Photoshop and the image appears in a tabbed window in the workspace. If you open another image it will appear in a new tab, and you can flip between images by clicking the tab.
The tools panel contains many of the important tools. There are too many tools to fit in one screen so some of the tools are grouped – right click on a tool icon to reveal any variants of the tool hidden beneath. Click on the ●●● icon towards the bottom to bring up a complete list including tools that didn’t fit in the current tool panel. You can add tools to the panel or remove tools you don’t use, to suit your needs. Save your changes as a new workspace using the Workspace Options menu.
Many of the tools have options visible in the options bar (eg with the brush tool you can choose brush size and feather among others.)
The photoshop panels include a wide range of functions. The histogram shows the pixel brightness for the selected layer in the image. The Layers panel shows the different layers, their order in the image, and their masks. As with many panels there are tabs. The Layers panel includes a chanel tab so you can look individually at the red, green and blue chanels. Panels may be docked (ie locked in the main photoshop window, or Floating panels which you can position, say, on a second monitor to give you easy access to the tools on the panel without cluttering your main workspace. You can drag docked panels and drop them elsewhere to float them (including individual tabs that can become untabbed panels this way).
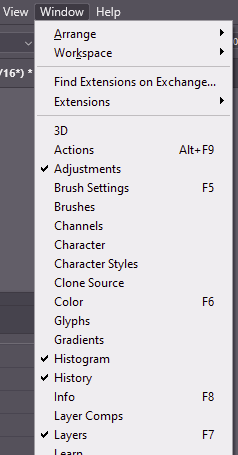
Individual panels can be accessed by selecting them on the Window menu if they are not already present on your workspace. There are a lot of windows available.
Once you have organised your workspace to suit your needs, you can save the layout using the Workspace Options menu. In newer versions of PS the system will remember the workspace layout at the time you exit the program and reload that layout when you next open PS. If you want, you can reset Photoshop’s standard workspaces back to default values (see the Reset item in the workspaces menu).
Keyboard shortcuts
Keyboard shortcuts can facilitate your use of Photoshop. You can see on the Window menu above, that some of the shortcuts are given for some of the windows. For example F5 brings up the Brush Settings panel. If you find yourself clicking into the menu regularly to access particular functions, make note of any shortcuts that may speed up your work. If there isn’t a defined shortcut for that function, you can customise the keyboard shortcuts to add a new one.
More Resources
For more detail, check out some of these resources: