
Your images are composed of pixels, each representing a spot of colour. Typically your camera will produce images more than 2000 pixels (px) high and more than 3000 px wide. The more pixels, the larger the storage needed for the files and the more bandwidth needed to send them electronically. If you want to use one of your images on the web, or perhaps submit to WCC for one of our monthly competitions or an outing gallery, you will need to produce a reduced size copy to a smaller specified size.
Tip: Always make a reduced size image as a copy. Don’t overwrite your original file.
Photoshop
In Photoshop, resizing images is easy. First save a copy of the full size image (eg MyBeautifulLandscape-2048px.jpg) using the File > Save as menu. Now you are ready to resize. Open the Image > Image Size menu to show the Image Size dialog.


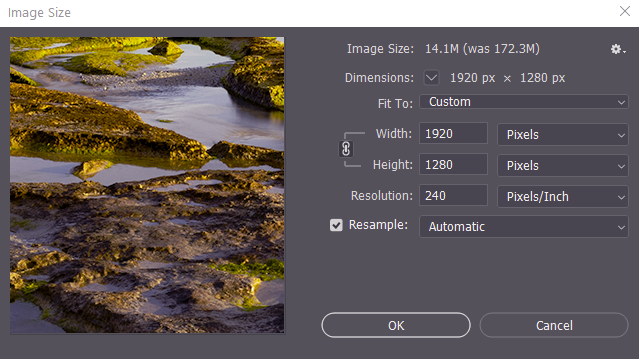
You will note that there are boxes for Width and Height. Check that the units to the right are set to Pixels. Check that the chain symbol linking width and height is set. This ensures the width and height will change in concert so there is no vertical or horizontal stretching in the result. Check the Resample check box is set. For WCC competitions images need to be at most 1920 px wide and at most 1080 px high. So, in the dialog enter 1920 Pixels in the width box. As you enter numbers, the height is automatically adjusted to match the image aspect ratio. Is the height 1080 or less? if you are ready to move on. However, with my image this reset the height to 1280 pixels, which is greater than 1080, so we need to make the height less. Change the height setting to 1080 Pixels and click in the width box. Width is 1620, less than 1920, so this is acceptable. Try not to use sizes where both the width and the height are less than the maximum allowed. If you do, your image will look small when shown at competition night, and the judge may find it hard to assess a smaller image.
If the image is for electronic display the resolution setting (here 240 Pixels/inch) is not important – it might make a difference if you are pasting into a wordprocessing document or presentation software. Best idea is to set it at one of the standards, 240 or 300 pixels/inch.
Next to the resample checkbox is a control to set the method for resampling. Usually you would use the Automatic setting.

Once you have configured the dialog simply press OK. The image will appear to shrink on screen (Image Size does not change the zoom setting. Press Ctrl-0 to expand the image to fill the window, or Ctrl-1 to zoom it to 1:1.
Save the image (as JPEG for WCC competitions), and you are done.
Lightroom
In Lightroom you use the Export module to export images (see below). Set the required size in Image Sizing, configure whatever else is needed, and click OK.

Resize the Canvas
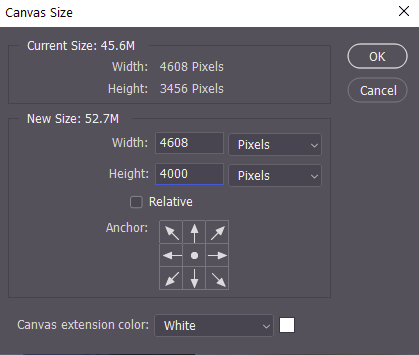
You might want to resize the canvas without changing the pixels on the image. For example you might want to add extra sky above an existing image. In Photoshop you use the Image >>Canvas Size menu. This shows the current size in pixels. To add, say, more space at the top, the Relative checkbos determines if the pixels you add are added to the existing pixels, of if the pixels you set are the final canvas size. Set the Anchor at the bottom (so the extra space is at the top), and enter a new canvas size, with the current width and some extra pixels height (see right). Choose the extension colour – what colour the newly added pixels will be, and click OK.
You can use tools like Content Aware Fill, or careful clone stamp use, to fill in the new area in your image.
Resources
- https://helpx.adobe.com/photoshop/using/resizing-image.html
- https://photoshopcafe.com/resize-images-photoshop-keep-quality/
- https://helpx.adobe.com/lightroom-classic/help/exporting-photos-basic-workflow.html
Below some Club Competition specific resizing instructions
from the WCC website
- Lightroom export settings for club competitions in 2016
- Setting up Lightroom Preset for WCC entries – Geoff Shaw (178KB PDF)
- Resizing images in PhotoShop – Vicki Moritz (2.9MB DOC)
- Creating Competition Files Using Adobe Elements (200KB DOCX)
If this is all too much, I made a web form to resize and rename images for WCC competitions. http://austvic.com/wcc/