With Levels and Curves you can fine tune the tonal range and even colours in your images.
Levels
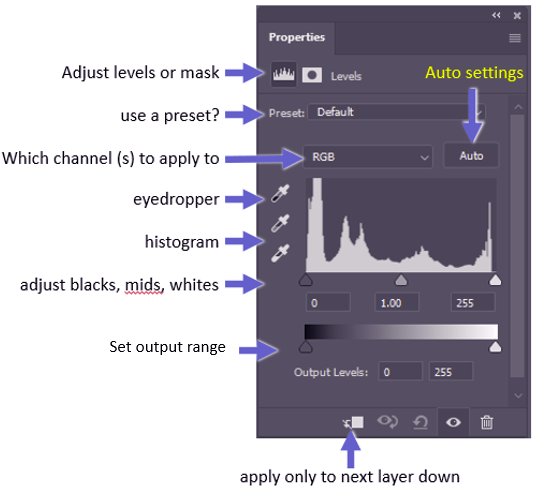
In Photoshop the Layers dialog has many features. The main ones are labelled below.

Try out the AUTO settings – it will try to balance the photo to a reasonably distributed histogram. Sometimes it works well, at least as a way to get started. If you don’t like the result, you can undo it (Ctrl-Z or Edit>>Undo or click back in the History panel). Click the black, mid or white eyedropper and then click on your image in a black/mid/white area. The channels will be balanced to produce pure black/mid grey/pure white for the tones selected. This can be a great way to clear a colour cast (eg a bluish tone in shadows).
Play with the adjustment sliders to see what they do. You can set the output range to limit the maximum white or black.
If you want, choose one of the individual colour channels rather than the overall RGB. Adjusting levels in a single channel will alter the colour balance and can be a good approach to dealing with colour casts (also look at split toning).

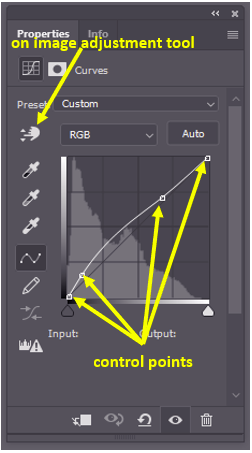
Curves adjustments are similar to Layers, but this allows more nuanced adjustments. On the histogram is a black 45 degree line which represents no change. If you click on the line to add a control point and drag the line upwards or downwards, you will lighten or darken the relevant tones. By adding multiple control points you can selectively alter some tones but not others. Click on the on image adjustment tool, and you can drag on an image area that you want to adjust (drag up to lighten, down to darken). You can remove control points by dragging them off the dialog.
Choose an individual colour channel rather than RGB to selectively adjust a single chanel at a time. This can be very useful to remove (or add) a colour cast, say to shadows.
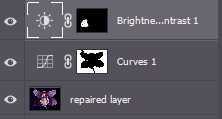
Levels and Curves adjustment layers can be masked to limit the areas on the image that are affected by the adjustment.

In the image left you can see some of the layers as I edit an orchid photo. I have a curves layer that is masked so it adjusts just the background and a brightness layer that is masked to adjust just one of the petals that was too dark. See the section on Layers and Masks for more info.
By default levels or curves adjustment layers works on the combined output of all the layers below it. But at the bottom is a control to limit the effect of the adjustment just to the layer immediately below.
Some further reading:
- https://helpx.adobe.com/photoshop/using/levels-adjustment.html
- https://helpx.adobe.com/photoshop/using/curves-adjustment.html
- https://edu.gcfglobal.org/en/photoshopbasics/levels-curves-and-color/1/
- https://www.picturecorrect.com/tips/when-to-use-levels-or-curves-in-photoshop/
- https://www.photoshopessentials.com/photo-editing/levels-curves/
Below are links related to applications other than photoshop, but apart from slight differences in the menu systems and dialogs, the same principles apply and these links are also applicable to photoshop, as the ones above are applicable to other programs. - https://lifeafterphotoshop.com/levels-and-curves-adjustments-in-luminar-4/
- https://photofocus.com/software/how-to-make-your-photos-look-great-with-curves-layers-in-luminar/
- https://topazlabs.com/how-to-use-tone-curves/
- https://support.dxo.com/hc/en-us/articles/115015480348-Apply-a-strong-curve-without-losing-detail
