Lightroom has three local adjustment tools (excluding the red-eye reduction tool), the linear gradient tool, the radial gradient tool and the paintbrush tool.

Gradient tool and Radial gradient tool
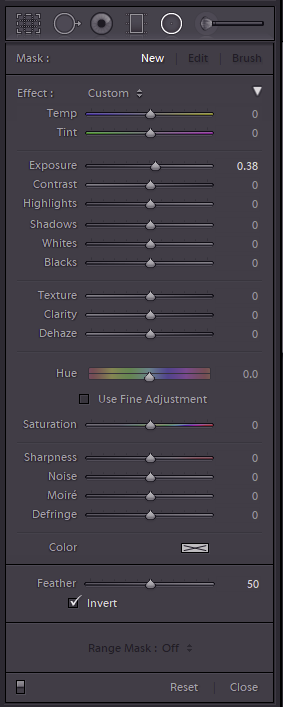
Clicking the gradient or radial adjustment icon brings up the adjustment dialog. You can have many individual local adjustments on your image, each with its own selection of settings and position. The top row of the dialog has which adjustment mask you want to edit – A new one, Edit and existing one (look for an edit pin (small circle overlaid on the image, assuming the Show Edit Pins control (see below image) is set appropriately. To edit the settings defined for an existing adjustment, click its pin. The current settings will be loaded under the Effect list. Click and drag on the image to apply the local adjustment mask. If you want to see the adjustment mask, click the Show Selected Mask Overlay checkbox below the image (the area where the currently selected local adjustment will be applied is overlaid in red, similar to a quick mask mode in Photoshop.

The local adjustment dialogues remember the previously used settings when you create a new adjustment. You might want to double click the word Effect below the mask section, to reset all the adjustments to no effect, so you can set the desired settings for the new adjustment starting from scratch, before you create the next local adjustment.
If you want to change the settings on any previous adjustment, select its pin, and change the settings as desired (including position, size and feathering). For radial masks you can also use the Invert check box to switch the mask from on in the centre to on everywhere outside the centre. So to make a vignette, you might turn off Invert, choose an adjustment that is a drop in exposure, then draw from the centre of the image outwards to generate the vignetting you desire. Alternatively, say to brighten someone’s face, you might set exposure up 0.5 stops, click on the Invert control and draw a radial gradient with a large feather over the face.
Sometimes you may want to tweak the mask for such an adjustment. for example you might use a linear gradient from the horizon up to darken the sky. However, you don’t want to darken the promontory that juts out into the sea crossing the horizon. There are a couple of ways to exclude this promontory from the local adjustment. First, you could paint out that area from the mask – whilst editing the adjustment, click the Brush word in the top line (Mask:) of the dialog. Make sure you have clicked Show Selected Mask Overlay, so you can see the extent of the gradient mask. Move the cursor over the image and it shows two concentric circles representing the size and feather of the brush. Hold down ALT and the central plus symbol changes to a minus symbol. Now, whilst holding down Alt, paint over the bits you want to exclude from the adjustment (ie the promontory). Use the scroll wheel to adjust brush size, and shift-scroll wheel to adjust the feather, and zoom in at 1:1 or greater to allow greater precision in your selection. You can also add to the mask by releasing Alt, so your linear gradient can be extended if needed. Radial gradients can be modified in a similar way.
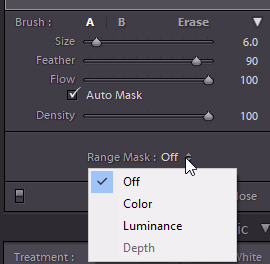
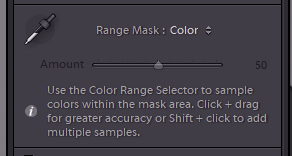
The second way, is to use a Range Mask (see the control at the bottom of the local adjustment panel). In the example we are discussing, you could use a luminance range mask since the sky is brighter than the land. Or a colour range mask since the sky is blue and the land is green. Select a colour range mask, then click the colour sampler tool on the sky. Since the pesky promontory is a different colour it will be excluded from the adjustment by the Range Mask.
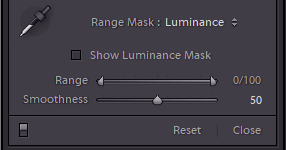
The luminance Range Mask is also very powerful. Here you set the limits on luminance on the underlying image where the mask is to apply. Drag the left slider to the right to exclude darker parts of the image from the mask, or drag the right slider to the left to exclude brighter areas. The Smoothness control adjusts the blending at the edges. Have a play and see what it does on your images.
Brush Adjustment Tool
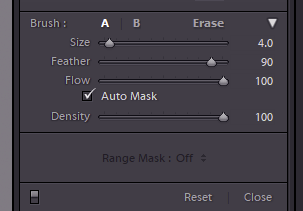
This has similar adjustment settings available as the linear and radial gradients, but in this case you use a paintbrush tool to paint in the mask. Below the settings is a section defining the brush – here you can set the size, and the feather (or use scroll-wheel/Shift-scroll) and the flow (how rapidly the brush strokes build up – with a low flow, you can use multiple strokes to gradually build up the adjustment mask, for subtle effects). You can define two brushes: A and B with different sizes and feather and flow (and the Erase brush also has its own size/feather/flow setting). For example you might have one large for the expanses, and one small for fine detail around edges. Once you have started a mask, you can click the Erase to switch to erase mode, for example if you painted past an edge in error. The Auto Mask setting can be useful to help automatically end the mask when you get to a contrasty edge. Often it will leave quite a speckled mask over the areas painted, but you can turn off Auto Mask and paint over these areas away from the edges you want to define the mask to fill in the missing flecks. The Density control allows you to tone down the overall effect of your adjustments (sometimes it is easy to set an extreme set of adjustments, making it easy to see where the adjustment changes the image, then dial back the effect to a more reasonable level later. There is also a Range Mask control that works in the same way as it does with linear and radial gradient local adjustments.
