Brightness levels and the histogram
Images are made up of 3 channels of red, green and blue pixels, each with its own brightness level. Brightness of 0 in all channels gives black; Brightness of 255 in all channels gives white. In post processing, simplistically, we can adjust the pixel values across the image to make the image brighter (increased exposure) or darker (decreased exposure) or adjust the balance between dark and light pixels (contrast).
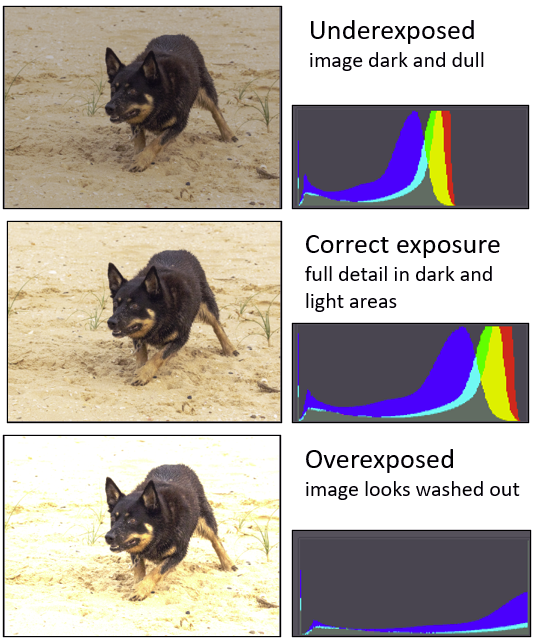
Lets look at an example. In the image below the left column shows the image. On the right are histograms showing the distribution of dark (to the left) and bright (to the right) pixels. In the middle row you can see from the histogram that the brightness levels are spread all the way from black to white. There is a hump towards the right because there is a large area of fairly bright sand in the image. With underexposure (top row), the histogram is skewed to the left, detail is lost in the shadows, and the image looks dull. Overexposure (bottom row) shifts the histogram to the right. The image looks washed out; detail is lost in the highlights, and the dark fur looks grey rather than black.

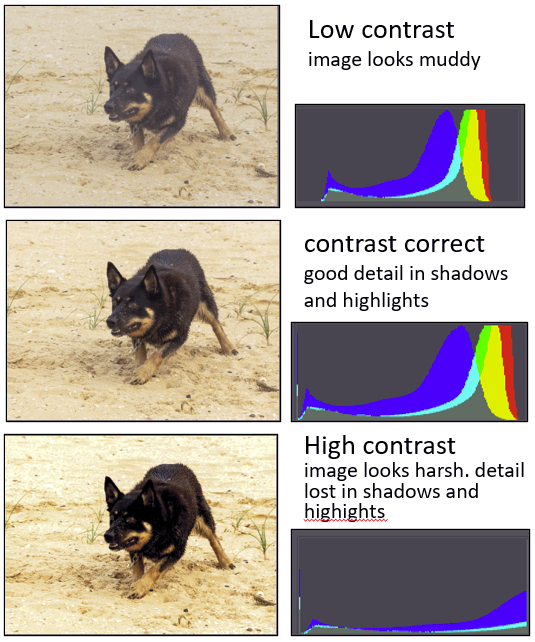
Contrast relates to how broadly the pixels are distributed in the histogram. If the contrast is too low the image will look muddy and there will be few if any pixels at the extremes of brightness and darkness. If contrast is too high the image will look harsh, with loss of detail in the highlights and shadows and most of the pixels are distributed to the extremes of lightness or darkness.


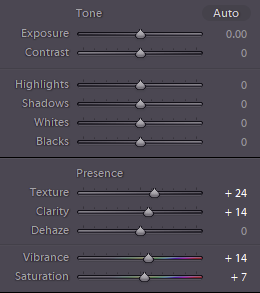
Fortunately, image processing software allows you to easily adjust the exposure and contrast. The basic edit controls from the Lightroom develop module show the Exposure and Contrast sliders along with several other sliders that give you a great deal of fine control. Most software has similar controls available. What do they all do? The best idea is to take an image and play with the sliders to see what the effects are.
- Exposure: adjusts the overall brightness
- Contrast: spreads out (slide to right) or centralises (slide to left) the tones in your image.
- Highlights: adjusts only the brightest areas. Use this to bring back lost detail in bright areas
- Shadows: adjusts the darker areas and can bring back detail in the shadows
- Whites: adjusts the white point of the image. Moving this slider to the right makes white tones brighter. This control affects the whole image though the effect is most obvious in the light areas.
- Blacks: adjusts the black point. Moving this slider to the left can move the dark areas further towards black. This control affects the whole image but the effect is most pronounced in the dark areas.
- Presence: the controls in this section work in various ways to bring out detail (slide to the right) or reduce detail (slide to the left). They can make your images pop. Experiment to find what they do.

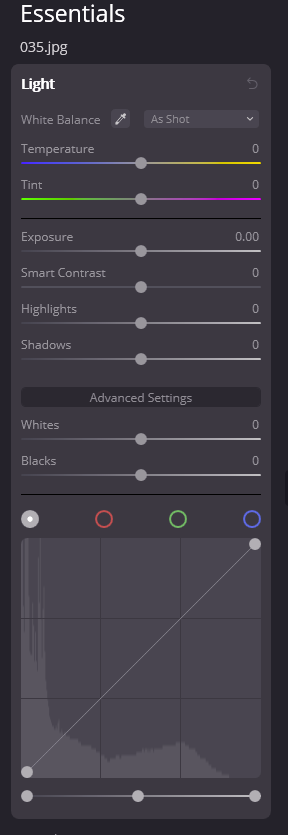
To the right is one of the editing panels from Luminar to show that the same sorts of basic controls are present – colour balance, exposure, contrast, highlights, shadows, whites and blacks. Other panels cover a suite of other adjustments. Topaz and Affinity have similar basic edit panels.
Further Resources
Here are some links to resources that explain more fully the editing controls and strategies to adjust your image. Some of the links also cover colour balance, cropping etc.
- https://louisem.com/43000/adobe-lightroom-for-beginners
- https://expertphotography.com/correct-exposure-lightroom/
- https://digital-photography-school.com/raw-photo-editing-in-lightroom/
- For users of Apple Mac Photos https://support.apple.com/en-au/guide/photos/pht806aea6a6/mac
- https://www.rei.com/learn/expert-advice/photo-editing-basics.html
- This resource discusses image histograms in some detail https://digital-photography-school.com/how-to-read-and-use-histograms/ .
