
When you have multiple layers in your image, you can use blending modes to alter how the different layers interact to produce the final effect. The brief description below is based on photoshop, but if you use other software that has layers and masks, it will probably also have blending modes that work in similar ways and probably have similar names.
Blending modes apply to layers, but can equally apply to edit tools like the clone brush. For example you can set the clone tool options to, say, darken, so when you use the brush, it will only clone over the areas where the target area is lighter (able to be darkened) than the source.
Here is a somewhat technical synopsis of the Blending Modes mostly from the Adobe website.
Normal Blending Modes
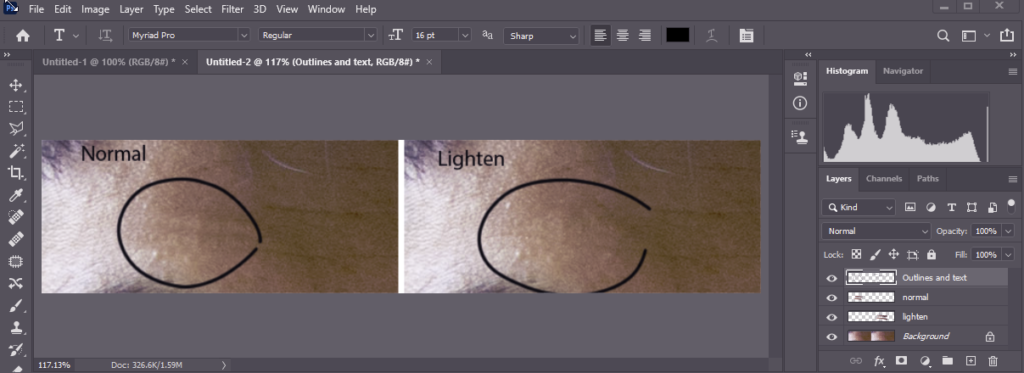
Normal
Edits or paints each pixel to make it the result color. This is the default mode. (Normal mode is called Threshold when you’re working with a bitmapped or indexed-color image.)
Dissolve
Edits or paints each pixel to make it the result color. However, the result color is a random replacement of the pixels with the base color or the blend color, depending on the opacity at any pixel location.
Darken Blending Modes
Darken
Looks at the color information in each channel and selects the base or blend color—whichever is darker—as the result color. Pixels lighter than the blend color are replaced, and pixels darker than the blend color do not change.
Multiply
Looks at the color information in each channel and multiplies the base color by the blend color. The result color is always a darker color. Multiplying any color with black produces black. Multiplying any color with white leaves the color unchanged. When you’re painting with a color other than black or white, successive strokes with a painting tool produce progressively darker colors. The effect is similar to drawing on the image with multiple marking pens.
Color Burn
Looks at the color information in each channel and darkens the base color to reflect the blend color by increasing the contrast between the two. Blending with white produces no change.
Linear Burn
Looks at the color information in each channel and darkens the base color to reflect the blend color by decreasing the brightness. Blending with white produces no change.
Darker Color
Compares the total of all channel values for the blend and base color and displays the lower value color. Darker Color does not produce a third color, which can result from the Darken blend, because it chooses the lowest channel values from both the base and the blend color to create the result color.
Lighten Blending Modes
Lighten
Looks at the color information in each channel and selects the base or blend color—whichever is lighter—as the result color. Pixels darker than the blend color are replaced, and pixels lighter than the blend color do not change.
Screen
Looks at each channel’s color information and multiplies the inverse of the blend and base colors. The result color is always a lighter color. Screening with black leaves the color unchanged. Screening with white produces white. The effect is similar to projecting multiple photographic slides on top of each other.
Color Dodge
Looks at the color information in each channel and brightens the base color to reflect the blend color by decreasing contrast between the two. Blending with black produces no change.
Linear Dodge (Add)
Looks at the color information in each channel and brightens the base color to reflect the blend color by increasing the brightness. Blending with black produces no change.
Lighter Color
Compares the total of all channel values for the blend and base color and displays the higher value color. Lighter Color does not produce a third color, which can result from the Lighten blend, because it chooses the highest channel values from both the base and blend color to create the result color.
Contrast Blending Modes
Overlay
Multiplies or screens the colors, depending on the base color. Patterns or colors overlay the existing pixels while preserving the highlights and shadows of the base color. The base color is not replaced, but mixed with the blend color to reflect the lightness or darkness of the original color.
Soft Light
Darkens or lightens the colors, depending on the blend color. The effect is similar to shining a diffused spotlight on the image. If the blend color (light source) is lighter than 50% gray, the image is lightened as if it were dodged. If the blend color is darker than 50% gray, the image is darkened as if it were burned in. Painting with pure black or white produces a distinctly darker or lighter area, but does not result in pure black or white.
Hard Light
Multiplies or screens the colors, depending on the blend color. The effect is similar to shining a harsh spotlight on the image. If the blend color (light source) is lighter than 50% gray, the image is lightened, as if it were screened. This is useful for adding highlights to an image. If the blend color is darker than 50% gray, the image is darkened, as if it were multiplied. This is useful for adding shadows to an image. Painting with pure black or white results in pure black or white.
Vivid Light
Burns or dodges the colors by increasing or decreasing the contrast, depending on the blend color. If the blend color (light source) is lighter than 50% gray, the image is lightened by decreasing the contrast. If the blend color is darker than 50% gray, the image is darkened by increasing the contrast.
Linear Light
Burns or dodges the colors by decreasing or increasing the brightness, depending on the blend color. If the blend color (light source) is lighter than 50% gray, the image is lightened by increasing the brightness. If the blend color is darker than 50% gray, the image is darkened by decreasing the brightness.
Pin Light
Replaces the colors, depending on the blend color. If the blend color (light source) is lighter than 50% gray, pixels darker than the blend color are replaced, and pixels lighter than the blend color do not change. If the blend color is darker than 50% gray, pixels lighter than the blend color are replaced, and pixels darker than the blend color do not change. This is useful for adding special effects to an image.
Hard Mix
Adds the red, green and blue channel values of the blend color to the RGB values of the base color. If the resulting sum for a channel is 255 or greater, it receives a value of 255; if less than 255, a value of 0. Therefore, all blended pixels have red, green, and blue channel values of either 0 or 255. This changes all pixels to primary additive colors (red, green, or blue), white, or black.
Note: For CMYK images, Hard Mix changes all pixels to the primary subtractive colors (cyan, yellow, or magenta), white, or black. The maximum color value is 100.
Inversion Blending Modes
Difference
Looks at the color information in each channel and subtracts either the blend color from the base color or the base color from the blend color, depending on which has the greater brightness value. Blending with white inverts the base color values; blending with black produces no change.
Exclusion
Creates an effect similar to but lower in contrast than the Difference mode. Blending with white inverts the base color values. Blending with black produces no change.
Subtract
Looks at the color information in each channel and subtracts the blend color from the base color. In 8- and 16-bit images, any resulting negative values are clipped to zero.
Divide
Looks at the color information in each channel and divides the blend color from the base color.
Component Blending Modes
Hue
Creates a result color with the luminance and saturation of the base color and the hue of the blend color.
Saturation
Creates a result color with the luminance and hue of the base color and the saturation of the blend color. Painting with this mode in an area with no (0) saturation (gray) causes no change.
Color
Creates a result color with the luminance of the base color and the hue and saturation of the blend color. This preserves the gray levels in the image and is useful for coloring monochrome images and for tinting color images.
Luminosity
Creates a result color with the hue and saturation of the base color and the luminance of the blend color. This mode creates the inverse effect of Color mode.
Extra Blending Modes for Painting Tools
Behind
Edits or paints only on the transparent part of a layer. This mode works only in layers with Lock Transparency deselected and is analogous to painting on the back of transparent areas on a sheet of acetate.
Clear
Edits or paints each pixel and makes it transparent. This mode is available for the Shape tools (when fill region ![]() is selected), Paint Bucket tool
is selected), Paint Bucket tool ![]() , Brush tool
, Brush tool ![]() , Pencil tool
, Pencil tool ![]() , Fill command, and Stroke command. You must be in a layer with Lock Transparency deselected to use this mode.
, Fill command, and Stroke command. You must be in a layer with Lock Transparency deselected to use this mode.
Extra Blending Tools for Groups
Pass Through
For groups the default Blending Mode is not Normal, but “Pass Through.” This Blending Mode tells Photoshop to treat all the layers within a group as if they were just stacked and not part of a group. The group is useful for organisation and all the layers all blend as if they were not grouped.
However, if you changed the group’s Blending Mode say to Normal, Photoshop will first blend the layers in the group, then it will blend the resulting composite with the layers below it using the Blending Mode that you selected. Effectively this is the same as merging all the layers in a group and then applying that (non Pass-Trough) Blending Mode.
This is particularly useful when compositing. If set a Group’s Blending Mode to Normal, the adjustment layers inside of the group will only affect the contents of that group.